Foolproof Lemon Meringue Pie
/
I’ve been going back and forth for the better part of a year as to whether I should actually do a post on lemon meringue pie. And for the better part of a year I’ve mostly decided against it. Until recently, when after making one for my Dad’s 91st birthday, I decided it was time to just do it. I wish the title of the post could be “The perfect lemon meringue pie in only 30 minutes!” Alas, no, as of this writing, I’ve yet to see or hear of a perfect, from scratch, recipe for lemon meringue pie that’s any shorter than the one our grandmothers used. But despite this, I think we can all agree that there are few things as exquisitely delicious as a beautifully home-made lemon meringue pie.
It’s no wonder that most of us have sort of a love-hate relationship with lemon meringue pie…love to eat it; hate to make it. It seems there should be a support group for that. And I’m here to tell you that the cavalry has arrived! And our support group looks suspiciously like the good folks over at Cook’s Illustrated. Fortunately, they’ve provided all of the help and support we need to make a superlatively delicious lemon meringue pie without fear and intimidation. Well, I suppose the fear and intimidation are up to you, but the pie is spot on and I’m happy to say, very do-able. The downside? Time. You must set aside a bit of time. The rest is a breeze.

I’ve been making lemon meringue pies for lots and lots of years, owing mostly to the fact that my Dad’s favorite pie, well his favorite dessert is lemon meringue and I’ve always done my best to make sure he got at least one a year, and possibly more often than that if I was feeling generously masochistic.
I finally just said enough already, and a couple of years ago I got serious about making a lemon meringue that didn’t scare me half to death and that I could depend on to come out perfectly every time. And that’s when I gave this recipe from Cook’s Illustrated a try and found the pie of my dreams. And Dad’s too, I might add.
So when his birthday rolled around last week and he turned 91 (way to go, Dad!), I felt completely confident and comfortable pulling out this recipe and getting it done. Which is exactly what I did, and once again, it came out beautifully. So I think it’s high time we faced our fears and started making ourselves some lemon meringue pies!
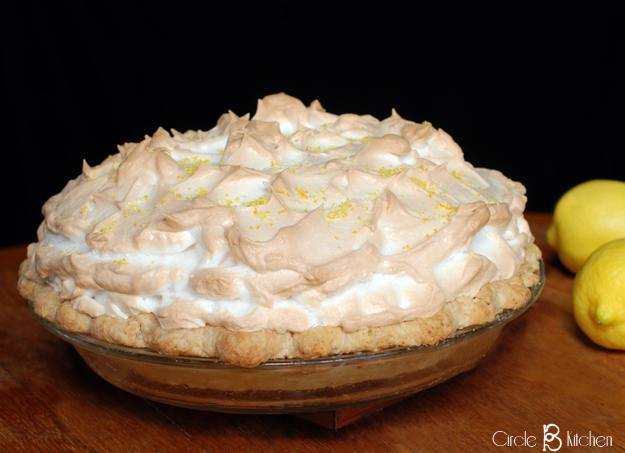
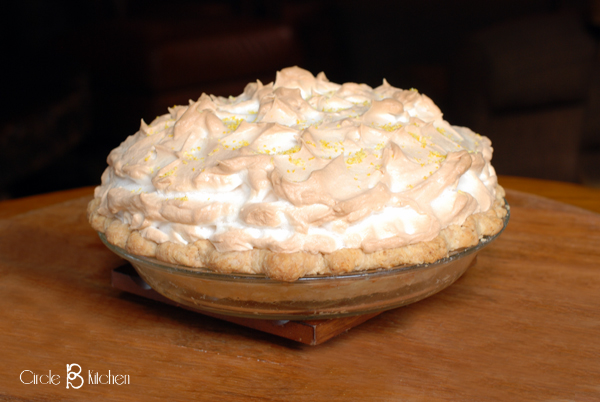
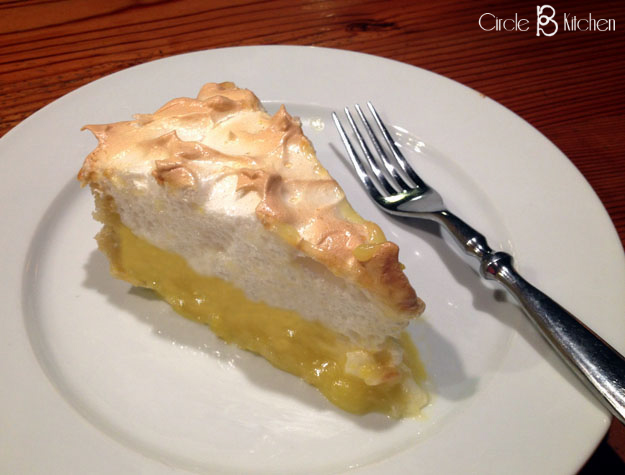
I’m pretty sure that what sets this pie apart from other lemon meringue pies has to be the meringue. It’s beautifully thick and fluffy and because of the addition of a cornstarch slurry, it doesn’t fall or shrink or shrivel. It really does come out perfect every time.
So in an attempt to make our lemon meringue pie assembly a bit more user-friendly, let’s just break it down into 3 parts…the crust, the filling and the meringue. And I’ll just start by apologizing for not having any process photos. I really wasn’t thinking that I would do a lemon meringue post but changed my mind after it was done, so I have no photos of it coming together. My bad.
Anyway, we’ll start with the crust, (here's my recipe) which I HIGHLY recommend you make a day or two ahead of time. If you’re buying your crust, you’ll still want to do this because the pie shell must be partially baked first. As in “blind-baking”, which sounds ominously difficult, but I promise you get to keep your eyes open for this part.
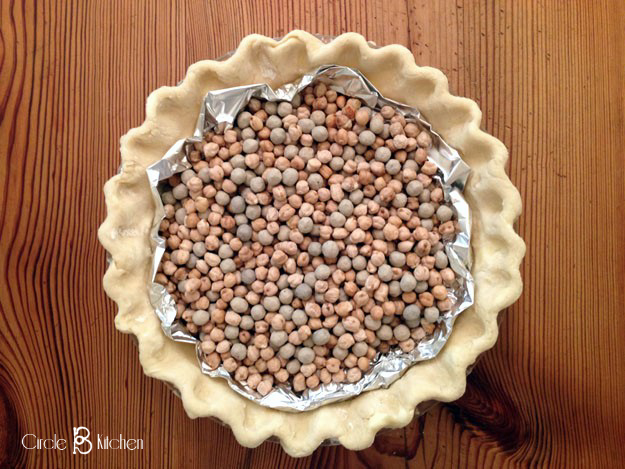
This not-so-aptly-named process just assures that your crust won’t get soggy and is cooked all the way through and involves lining your pie shell with foil, filling it with dried beans or pie weights and partially cooking it. Then it must cool before you add the filling, so I just stash it in the fridge until it’s time to make the pie.
Then there’s the filling, which I think is the easiest part of the deal, takes only minutes to make and is a perfect balance of sweet and lemony goodness.
Lastly, the dreaded meringue. This, my friends, is where we usually check out and say no, thank you. I’ll just put whipped cream on top. But not today. No, people, today we will be brave! We will make meringue!! And it will be beautiful and it won’t shrink and your culinary street cred will soar and mostly you’ll just marvel at the beauty that you have created. Oh, and it will taste really good too.
All of this is because those clever folks at Cook’s Illustrated have provided us a little trick and it’s a simple little mixture of cornstarch and water that you will whip into your egg whites, which will stabilize them and keep them looking beautiful for about 3 months. OK, no lemon meringue pie would ever sit uneaten that long, but my point is that this meringue will not fall, shrink or collapse. Whatever calamity has befallen your meringue in the past, it will not happen here. This works.
So we know we can make this pie. And it will be perfect and it will be beautiful, but here’s the bonus… it tastes amazing. If you love lemon meringue as I do, this is non-negotiable. It doesn’t matter how good it looks, it’s gotta taste awesome and this one does.
Alrighty then, people. Gird your loins, get out your mixers and make some pie. With meringue! Here’s the recipe…
Foolproof Lemon Meringue Pie
Click here for a printable recipe
Recipe courtesy, Cook's Illustrated
This is undoubtedly the best, most reliable lemon meringue pie I've made. It turns out perfectly every time, and after you get over the lengthy instructions, you'll see that there's nothing at all tricky about any of it. Each step is quite simple and straightforward. I totally recommend that you prepare your pie crust one or two days before you make the pie.
Ingredients:
One 9-inch pie shell, store-bought or homemade(here's my recipe)
Filling:
1½ cups water
1 cup (7 oz) granulated sugar
¼ cup cornstarch (I add just a little more to ensure that the filling holds up)
⅛ tsp salt
6 large egg yolks
1 Tbls grated lemon zest plus ½ cup fresh lemon juice (about 3 lemons)
2 Tbls unsalted butter
Meringue:
⅓ cup water
1 Tbls cornstarch
4 large egg whites
½ tsp vanilla extract
¼ tsp cream of tartar
½ cup (3½ oz) granulated sugar
Instructions
For the Pie Crust:
The crust must be partially baked before assembling the pie, which is called “blind baking”. You will need a piece of aluminum foil and about 1 lb of dried beans or pie weights. You can do this 1 or 2 days before you plan on making the pie. Here's how it's done...
Preheat oven to 450 degrees and adjust the oven rack to the lower third of the oven.
1. Roll your pie crust out and place it in a 9-inch pie pan, leaving about ½-inch overhang. Fold the overhang under along the edge of the pie pan and the crimp or flute as desired.
2. Place the pie in the refrigerator for 30 to 60 minutes to chill, which will help the crust to keep its shape in the oven.
2. Line the chilled pie crust with a piece of aluminum foil, folding the edges as needed to fit just under the outside edge of the crust. Fill the pie with dried beans or pie weights and place it in the oven. Bake for 15 minutes. Reduce the oven temp to 350 degrees.
3. Remove the pie from the oven and carefully remove the foil and very hot beans to a pan or bowl to cool. Use a fork to gently prick the bottom of the crust, which will ensure that the crust will not rise or form bubbles in the oven. Return the pie to the oven and continue baking for another 10 minutes or so. The crust should be lightly golden brown.
4. Place the pie pan on a rack to cool completely and then refrigerate until you are ready to assemble the pie. I place my pie shell in an extra large Ziploc bag to protect it in the refrigerator.
When you are ready to assemble the pie…
Adjust oven rack to middle position and preheat oven to 325°F.
For the Filling:
Bring water, sugar, cornstarch, and salt to a simmer in large saucepan, whisking occasionally at first and then as it thickens, stir it constantly. When mixture starts to turn translucent, whisk in egg yolks, two at a time. Whisk in lemon zest and juice and butter. Return mixture to brief simmer, then remove from heat. Lay sheet of plastic wrap directly on surface of filling to keep warm and prevent skin from forming. (I just put a lid on my pan)
For the Meringue:
Bring water and cornstarch to simmer in small saucepan and cook, whisking occasionally, until thickened and translucent, 1 to 2 minutes. Remove from heat and let cool slightly.
Using stand mixer fitted with whisk, whip egg whites, vanilla and cream of tartar on med-low speed until foamy, about 1 minute. Increase speed to med-high and beat in sugar mixture, 1 tablespoon at a time, until incorporated and mixture forms soft, billowy mounds. Add cornstarch mixture, 1 tablespoon at a time; continue to beat to glossy, stiff peaks, 2 to 3 minutes.
Meanwhile, remove plastic from filling and return to very low heat during last minute or so of beating meringue (to ensure filling is hot).
Pour still-warmed filling into the pre-baked pie crust. Using a rubber spatula, immediately distribute meringue evenly around the edge and then the center of pie, attaching meringue to pie crust to prevent shrinking. Using back of spoon, create attractive swirls and peaks in meringue. Bake until meringue is light golden brown, about 20 minutes.
Place the pie on a wire rack to cool for at least 3 hours, but longer is better to ensure that the filling has ample time to set up.