Light Wheat Sandwich Bread
/
It really doesn’t matter how hectic or busy or stressfully whacked out I am, making bread is all the therapy I need (but maybe I should consult The Husband about that). Truth be told, measuring, mixing, kneading, watching the dough rise, the aromas of baking bread, and of course, eating fresh bread from the oven are pretty much the most fun I have in the kitchen. Whether it’s these amazing little dinner rolls, cinnamon rolls, pizza dough, focaccia or this amazing wheat sandwich bread, I very often have some kind of dough rising on the counter.
And I know that there are those of you who think they can’t work with yeast dough or are intimidated by the very thought of it, but I’m here to say bah! If I can do it, anyone can. And I mean it. I started making bread back in the 70’s when I was still too young to think I couldn’t do it. I mean, everyone made bread back in the 70’s, right?
And of course I’ve created some monstrous disasters, but who cares? It’s just bread. Sometimes it’s good even when it’s bad. And when it’s really bad, you just toss it and try again next week (or tomorrow). Like most things in life, the more you do it, the better you get at it. And if you’re going to aspire to be good at something, you could do much worse than homemade bread. You know?
As simple as this recipe is, I know there are no-knead bread recipes out there that are even simpler and create a wonderful boule or baguette. And as great as they are, this is a different kind of bread altogether, and creates an old-fashioned loaf that will remind you of your grandmother’s kitchen (if your grandmother was the kind that made bread). Yes, there is kneading.
To be honest, I really don’t quite get the aversion to kneading. I love the luxurious feel of dough in my hands, and how it somehow magically transforms from a shaggy mess to a smooth satiny pillow of yeasty loveliness.
And for those of you who love to make bread as much as I do, this particular recipe, which comes from The Bread Baker’s Apprentice, is simpler than most in that you just dump everything in the mixer and let the machine do all the work of bringing it together.

If you don’t have a mixer with dough hooks, you can still just mix it all together with a wooden spoon and then proceed with kneading.
And then you get to knead. And when it gets really smooth and soft and pliable,

you just plop it in your bowl and let it rise


and then roll it out to fit the pan...


and let it rise again...

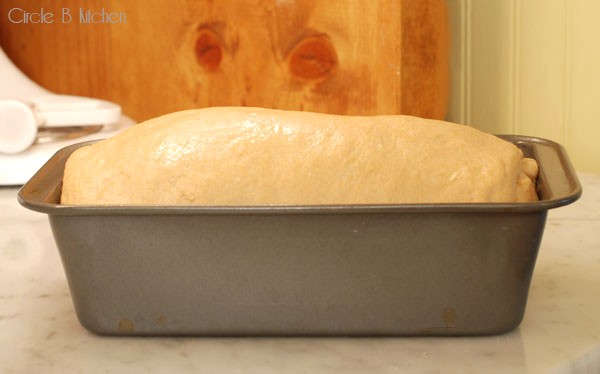
and then bake it...oh the aromas...

and then eat it and maybe even share it.

And I’d say that makes it completely worthy of your efforts. Here’s the recipe…
Light Wheat Sandwich Bread
Click here for a printable recipe
From The Bread Baker's Apprentice
This makes a really wonderful loaf of sandwich bread that's great for toast too. It really is one of the easiest bread doughs to work with. I always start with 1 1/2 cup of water, but add however much is needed to make a fairly moist dough. In the summer when it's humid, I find the 1 1/2 cups is perfect, but in the dry winter months I almost always need to add quite a bit more. The more you make this, the easier it is to gauge the moisture of the dough. And yes, it says to knead the dough for 10 minutes...what else do you have to do?!
Makes one 2-lb. loaf
1 1/2 cups (6.75 oz) unbleached bread flour
1 ¾ cups (8 oz) whole-wheat flour
2 T (.6 oz) gluten flour (optional)
1 1/2 tablespoons (.75 oz.) granulated sugar
1 1/2 teaspoons (.38 oz.) salt
3 tablespoons (1 oz.) powdered milk
1 1/2 teaspoons (.17 oz.) instant yeast
2 tablespoons (1 oz.) shortening or unsalted butter, at room temperature
1 ½+ cups (12 oz.) water, at room temperature
1. Stir together the bread flour, whole-wheat flour, sugar, gluten, salt, powdered milk, and yeast in mixing bowl. Add the shortening, and water. Mix on low speed with the until the ingredients form a ball.
2. Knead dough for about 10 minutes. Lightly oil a large bowl and transfer the dough to the bowl, rolling it around to coat it with oil. Cover the bowl with plastic wrap.
3. Ferment at room temperature for 1 1/2 to 2 hours, or until the dough doubles in size.
4. Remove the dough from the bowl and press it by hand into a rectangle about 3/4 inch thick, 6 inches wide, and 8 to 10 inches long. Form it into a loaf by working from the short side of the dough, rolling up the length of the dough one section at a time, pinching the crease with each rotation to strengthen the surface tension. It will spread wider as you roll it. Pinch the final seam closed with the back edge of your hand or with your thumbs. Place the loaf in a lightly oiled 8 1/2 by 4 1/2 inch bread pan; the ends of the loaf should touch the ends of the pan to ensure an even rise. Mist the top with spray oil and loosely cover with plastic wrap.
5. Proof at room temperature for approximately 60 to 90 minutes or until the dough crests above the lip of the pan.
6. Preheat the oven to 350 degrees.
7. Bake for 30 minutes. Rotate the pan 180 degrees and continue baking for another 15 to 30 minutes, depending on the oven. The finished loaf should register 190 degrees in the center, be golden brown on the top and the sides, and sound hollow when thumped on the bottom.
8. When the bread is finished baking, remove it immediately from the loaf pan and cool it on a rack for at least 1 hour, preferably 2 hours.